Installing an SPC floor like a professional: here's how you do it!
Are you busy searching our webshop and suddenly come across the panels of your dreams? Specifically, a beautiful SPC floor. But now the question arises: "How do you install it in your home?" No worries! In this blog, we will guide you and demonstrate how to lay an SPC floor, even if you already have the panels at home. For now, set aside the hammer and tools, take the time to read through these steps, and give your project a perfect start!
How do I install the SPC floor?
Step 1: Purchase an SPC floor that suits your home from Aqua-Step.com. We offer high-quality panels at competitive prices. Click here and explore them for yourself!
Step 2: Both Aqua Click Tiles and Vinyluxe panels can be installed as floating or glued down. If you're curious about how this works exactly, continue reading. Note: Ensure that the floor is completely level and has no irregularities larger than 3 millimeters. If there are any imperfections, it is necessary to level the floor first. We highly recommend using an underlayment, as it significantly improves the insulation of your SPC floor and reduces sound transmission. Moreover, the underlayment helps to conceal minor irregularities of less than 3 millimeters.
Step 3: The panels have a 'fall down' connection on the short sides, which you use to interlock them. Make sure to firmly attach them together and then gently tap with a tapping block or plastic hammer to lock them in place. The long sides feature a click connection. Ensure that you correctly position the panels until you hear an audible click, indicating that the panel is in its proper place.
Step-by-step: Gluing SPC floors
If you prefer to glue down the tiles, no problem. Our panels are well-suited for this purpose. In fact, in bathrooms, we recommend always gluing the floor due to the high humidity and temperature variations. Gluing the floor minimizes SPC floor movement, preventing water from seeping into the seams. This ensures a waterproof and durable floor.
Step 1: When gluing the panels, it is essential to thoroughly degrease both the subfloor and the backside of the tiles. This ensures optimal adhesion.
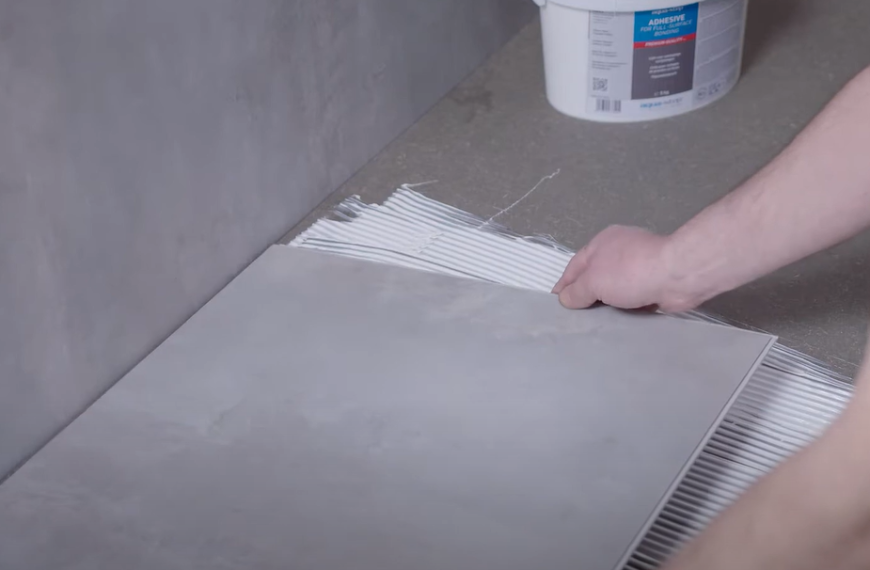
Step 2: Apply the polymer adhesive evenly on the subfloor using a trowel. Then, position the tile and firmly press it for 5 seconds. If you need to cut the tiles or panels, use a utility knife to score and then carefully break them to the desired size.
For a flawless final result: Choose an SPC floor
By applying these steps throughout the entire space, you will transform an unfinished, outdated area into a completely new environment. Let's be honest, a beautifully finished bathroom, kitchen, or living room undoubtedly affects your mood. Enjoy the positive atmosphere and increased comfort in your renewed space!
Watch our helpful installation videos and learn how to proceed step by step! If you have any questions, do not hesitate to contact us."


